Android Studio trikčių diagnostika
Prarasta raktų saugykla
Jei atnaujindami AndroidAPS naudojate tą pačią raktų saugyklą, savo išmaniajame telefone nereikia pašalinti ankstesnės AAPS versijos. Todėl raktų saugyklą rekomenduojama išsaugoti saugioje vietoje.
Jei vis dėlto nerandate ankstesnės raktų saugyklos, galite elgtis taip:
- Eksportuokite nustatymus savo telefone.
- Nukopijuokite failą su nustatymais iš savo išmaniojo telefono į išorinės saugyklos vietą (pvz. jūsų kompiuteryje, debesijos saugykloje...).
- Įsitikinkite, kad failas „AndroidAPS Preferences“ išsaugotas saugiai.
- Sukurkite naujos versijos pasirašomą apk failą, kaip aprašyta puslapyje Atnaujinimas.
- Pašalinkite ankstesnę AAPS versiją iš savo išmaniojo telefono.
- Įdiekite naują AAPS versiją į savo išmanųjį telefoną.
- Importuokite savo nustatymus - jei jų nerandate savo išmaniajame telefone, tiesiog nukopijuokite juos iš išorinės saugyklos vietos į išmanųjį telefoną.
- Toliau naudokitės uždaru ciklu.
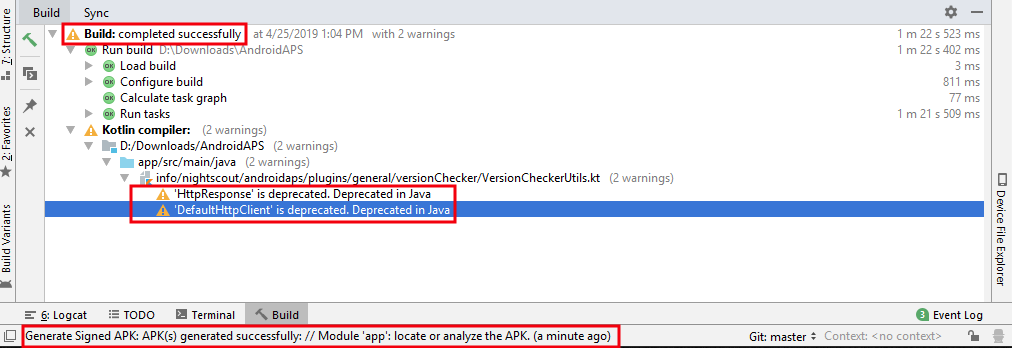
Kotlin compiler perspėjimas
Jei kūrimas buvo sėkmingai baigtas, bet jūs gaunate įspėjimą iš Kotlin Compiler, galite jo ignoruoti.
Programa buvo sėkmingai sukurta ir ją galima perkelti į išmanųjį telefoną.
Raktas sukurtas su klaidomis
Kuriant naują raktų saugyklą, kad sukurtumėte pasirašytą APK, Windows gali pasirodyti šis klaidos pranešimas

Atrodo, kad tai yra Android Studio 3.5.1 ir jo Java aplinkos, pateiktos naudojant Windows, klaida. Raktas sukurtas teisingai, tačiau rekomendacija neteisingai rodoma kaip klaida. Šiuo metu to galima nepaisyti.
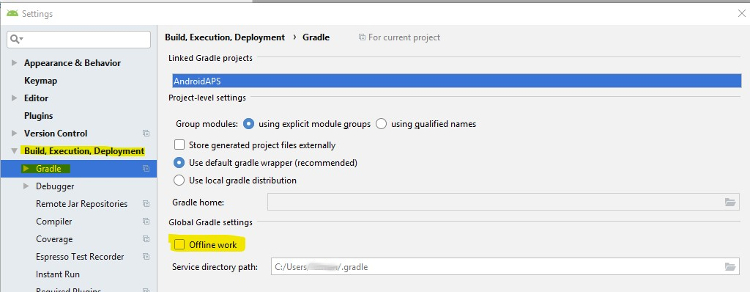
Nepavyko atsisiųsti… / Darbas neprisijungus
Jei gausite klaidos pranešimą, kuri atrodo panašiai

įsitikinkite, kad „darbas neprisijungus“ yra išjungtas.
Spustelėkite File > Settings
Klaida: buildOutput.apkData neturi būti tuščia
Kartais kurdami APK failą galite gauti šį klaidos pranešimą
Klaidos kuriant APK.
Klaida: buildOutput.apkData neturi būti tuščia
Tai yra žinoma Android Studio 3.5 klaida ir greičiausiai bus ištaisyta tik Android Studio 3.6. Trys variantai:
- Manually delete the three build folders (normal “build”, build folder in “app” and build folder in “wear”) and generate signed apk again.
- Set destination folder to project folder instead of app folder as described in this video.
- Change apk destination folder (different location).
Unable to start daemon process
If you see an error message like the one below you probably use a Windows 10 32-bit system. This is not supported by Android Studio 3.5.1 and above. I you are using Windows 10 you must use a 64-bit operating system.
There are a lot of manuals on the internet how to determine wether you have a 32-bit or 64-bit OS - i.e. this one.

No CGM data
- In case you are using xDrip+: Identify receiver as described on xDrip+ settings page.
- In case you are using patched Dexcom G6 app: Make sure you are using the correct version from the 2.4 folder.
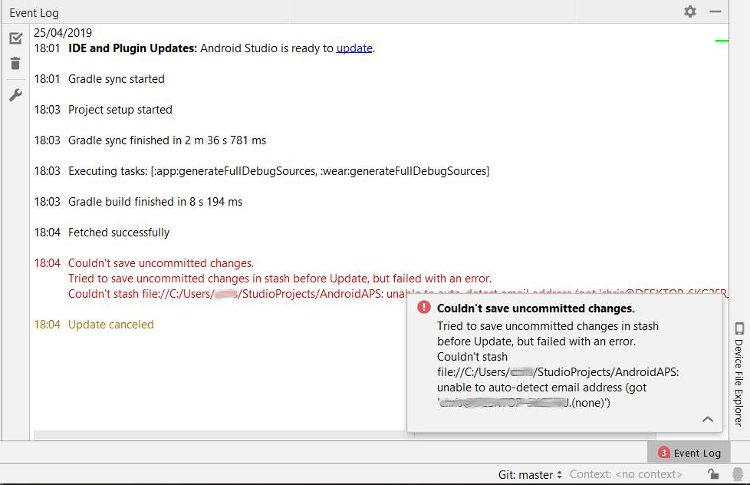
Uncommitted changes
If you receive failure message like
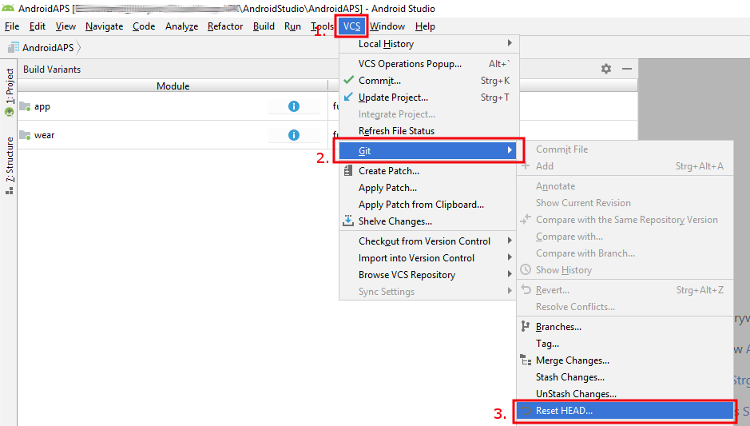
Option 1 - Check git installation
- git might be not installed correctly (must be globally available)
- when on Windows and git was just installed, you should restart your computer or at least log out and re-login once, to make git globally available after the installation
- Check git installation
- If no git version is shown in check but git is installed on your computer, make sure Android Studio knows where git is located on your computer.
Option 3 - Check for updates
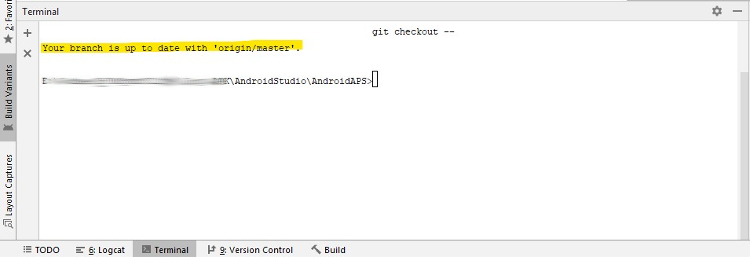
Copy ‘git checkout –’ to clipboard (without quote signs)
Switch to Terminal in Android Studio (lower left side of Android Studio window)
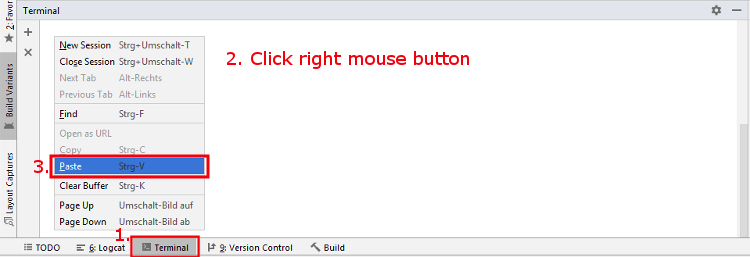
alt: Android Studio Terminal Paste copied text and press return
App not installed
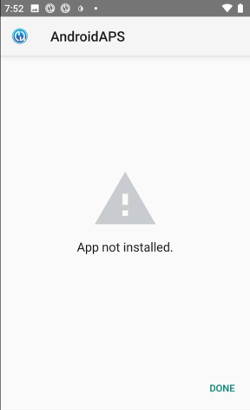
- Make sure you have transferred the “app-full-release.apk” file to your phone.
- If “App not installed” is displayed on your phone follow these steps:
- Export settings (in AAPS version already installed on your phone)
- Uninstall AAPS on your phone.
- Enable airplane mode & turn off bluetooth.
- Install new version (“app-full-release.apk”)
- Import settings
- Turn bluetooth back on and disable airplane mode
App installed but old version
If you build the app successfully, transferred it to your phone and installed it successfully but the version number stays the same then you might have missed to update your local copy <../Update-to-new-version.html#update-your-local-copy>.
None of the above worked
If non of the above tips helped you might consider building the app from scratch:
- Export settings (in AAPS version already installed on your phone)
- Have your key password and key store password ready
- In case you have forgotten passwords you can try to find them in project files as described here. Or you just use a new keystore.
- Build app from scratch as described here.
- When you have build the APK successfully delete the exiting app on your phone, transfer the new apk to your phone and install.
- Import settings
Worst case scenario
In case even building the app from scratch does not solve your problem you might want to try to uninstall Android Studio completely. Some Users reported that this solved their problem.
Make sure to uninstall all files associated with Android Studio. If you do not completely remove Android Studio with all hidden files, uninstalling may cause new problems instead of solving your existing one(s). Manuals for complete uninstall can be found online i.e. https://stackoverflow.com/questions/39953495/how-to-completely-uninstall-android-studio-from-windowsv10.
Install Android Studio from scratch as described here and do not update gradle.